Hello,
I hope you all are in good health and learning something new each day. Well, I have something to share with you which might help you in…
FUN PROJECTS
IOT
EMBEDDED SYSTEMS
Or in ROBOTICS
I am talking about tireless wireless connectivity.
While I was working with ESP32, I found something which helped me a lot in achieving wireless connectivity for my robots, home automation projects, and my voice-controlled robots. I also used it with Amazon Alexa… That was really interesting.
So…
let’s continue how can we use it for our prototypes and projects?
ESP official website link : https://www.espressif.com/en/solutions/low-power-solutions/esp-now
you will find some info like this
“”
This is a low-power Wi-Fi switch based on ESP32-C2. It is different from Bluetooth LE and Zigbee wireless switches, because this solution needs no gateway and can be used with the ESP-NOW protocol, which enables quicker responses. Our Wi-Fi switch has a long battery life, and can be the basis of a wide range of products, thanks to the tiny size of the cell battery.
“”
Key Benefits
01 No Gateway and Receiving-IC Required
02 Quicker Controllable Response
03 Reliable Bidirectional Data Transmission
04 Ultra-Low Power Consumption
05 Easy-to-Configure
06 Diversified Product Forms
ESP-NOW is a wireless communication protocol based on the data-link layer, which reduces the five layers of the OSI model to only one. This way, the data need not be transmitted through the network layer, the transport layer, the session layer, the presentation layer, and the application layer. Also, there is no need for packet headers or unpackers on each layer, which leads to a quick response reducing the delay caused by packet loss in congested networks.
Well after using it and implementing it I would say these points are valid.
If you do not know about OSI model you can refer this given link : https://www.9tut.com/osi-model-tutorial
Lets continue towards the most interesting part
My ESP MCU’s
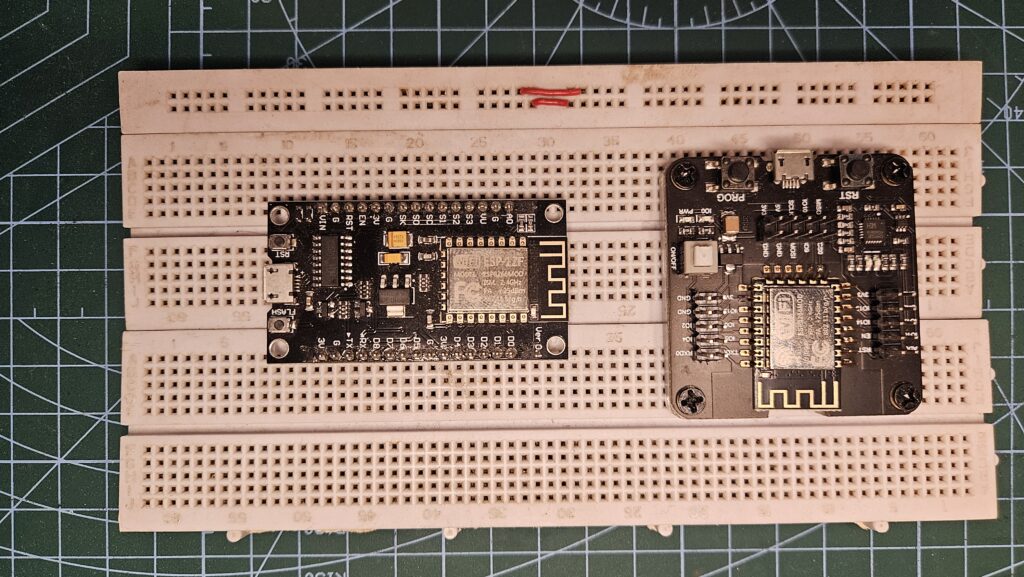
I will be explaining my code. Just to give you some context, I used this short code for my fun project.
I made RC car using this it is easy to make, and the good part is you can interface sensors with it.
In this mini project, you will understand a few things that I found important to know.
Let us go over the transmission code section (Board 1).
There are some variables which you will understand along the way. Most of them are used to store data.
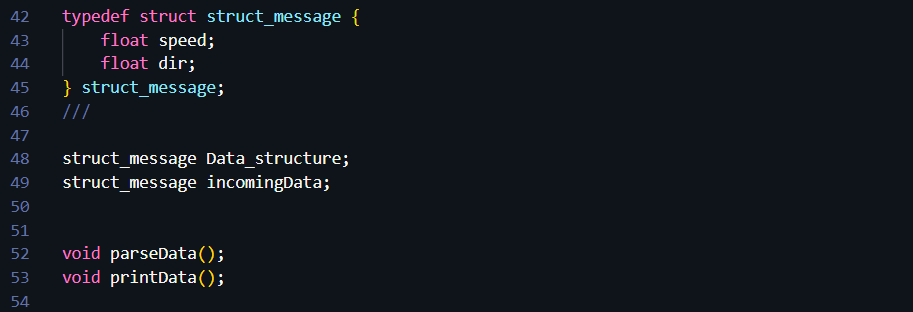
This below structure is to store data
Before we dive into more in the code, it is important to understand a few functions, as we will be using them throughout.
esp_now_init()
-> Initializes the ESP-NOW protocol stack on your ESP8266 or ESP32 device.
-> ESP-NOW is not enabled by default. Before any ESP-NOW communication can happen, this function must be called after Wi-Fi has been initialized (even though ESP-NOW works without internet).
Important Notes :
->The device must first be set to Wi-Fi station mode using WiFi.mode(WIFI_STA)
-> If esp_now_init() fails (returns a non-zero value), ESP-NOW will not work.
esp_now_add_peer()
-> Adds a peer device (another ESP board) to communicate with over ESP-NOW.
-> ESP-NOW requires you to specify who you’re sending data to. This function “registers” that device using its MAC address.
-> If you are using one ESP8266 as a transmitter and another as a receiver. You must add the receiver’s MAC address here so the transmitter knows where to send data.
esp_now_send()
-> Sends data to a specific peer over ESP-NOW.
-> This function is used to transmit messages. You must first prepare a data structure (like struct_message) and use this function to send it to a registered peer.
-> A pointer to the data you want to send.
Important Note: The peer must be registered using esp_now_add_peer() before calling this.
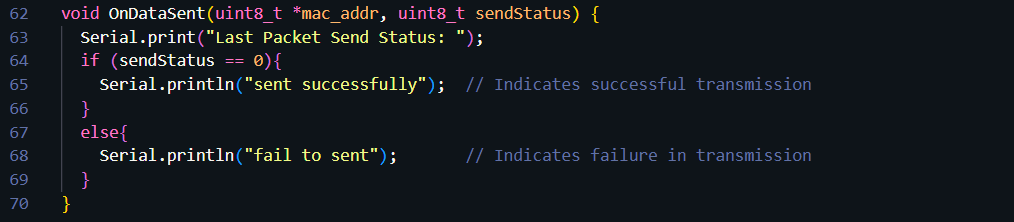
esp_now_register_send_cb()
-> Registers a callback function that gets triggered after a data send attempt.
-> To check whether the message was sent successfully or failed (e.g., if the receiver was out of range or unregistered).
You create a function like this:
void OnDataSent(uint8_t *mac_addr, uint8_t sendStatus)
{
  if (sendStatus == 0) {
    Serial.println("Send successful");
  } else {
    Serial.println("Send failed");
  }
}
And register it:
esp_now_register_send_cb(OnDataSent);This helps with debugging and reliability, you can take action if a message fails.
esp_now_register_recv_cb()
-> Registers a callback function that is triggered when data is received.
-> Without this function, your program would not know when or what data has been received.
You define a function like this:
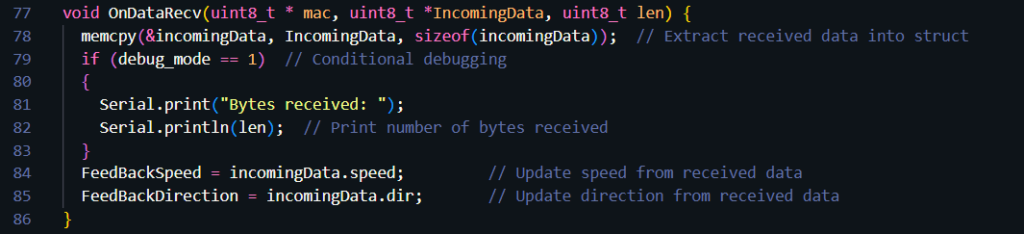
void OnDataRecv(uint8_t *mac, uint8_t *incomingData, uint8_t len)
{
  memcpy(&incomingStruct, incomingData, sizeof(incomingStruct));
}
And register it:
esp_now_register_recv_cb(OnDataRecv);This allows your ESP device to react to incoming messages such as updating speed/direction or triggering an event.
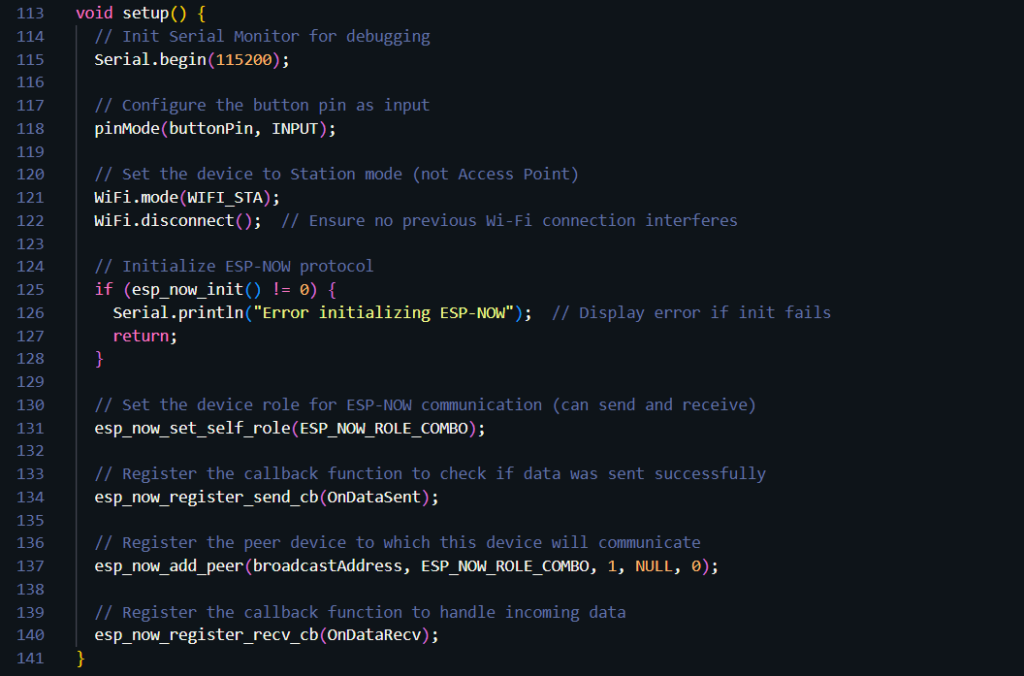
Used all these above functions in void setup()
control()
-> This function is where you define what actions to perform with the received data. For example, if you’re receiving speed and direction values, you can use this function to control a motor based on that data.
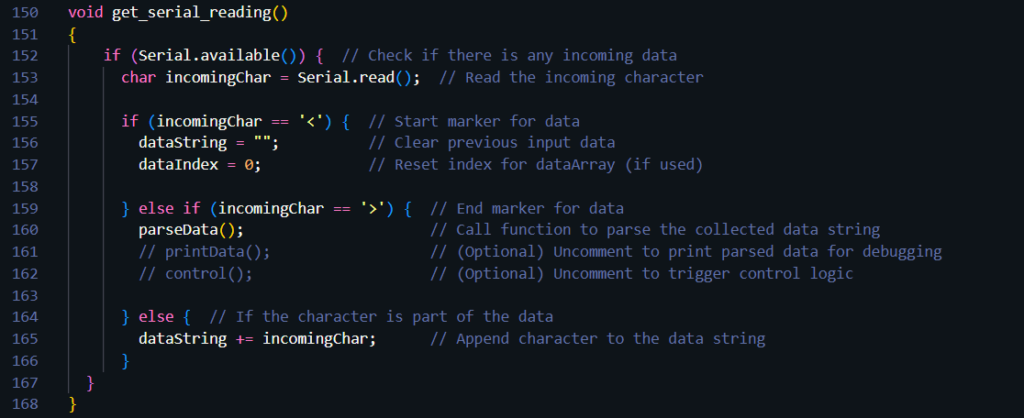
get_serial_reading()
-> This is a helper function that reads data from the serial input. You can use it when you want to send data from a computer or another device to the microcontroller via the serial port.
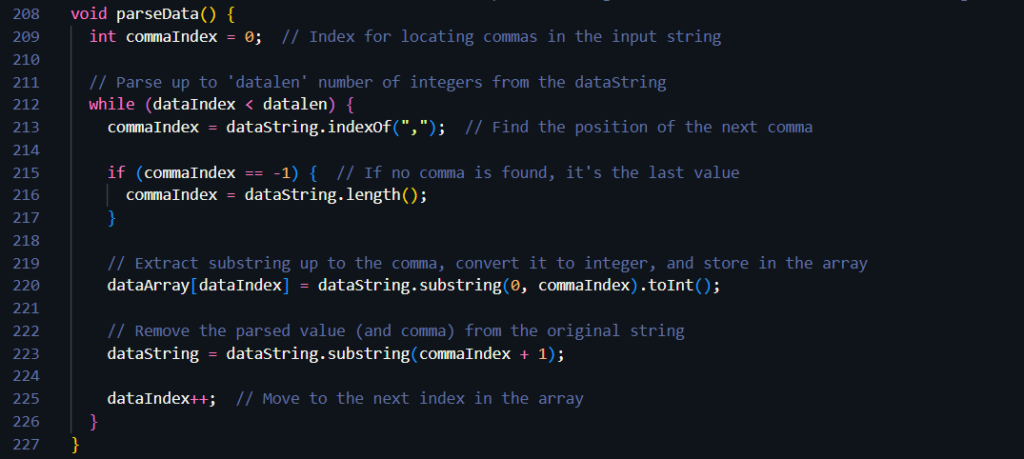
parseData()
-> This function processes (or “parses”) the raw serial data into a usable format—such as splitting a comma-separated string into individual values.
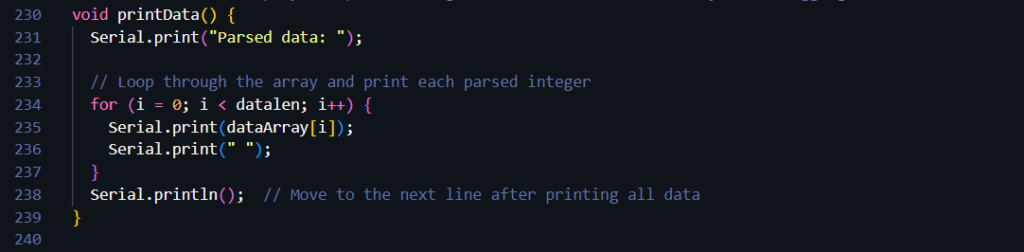
printData()
-> As the name suggests, this function prints the processed data, mainly for debugging or monitoring purposes.
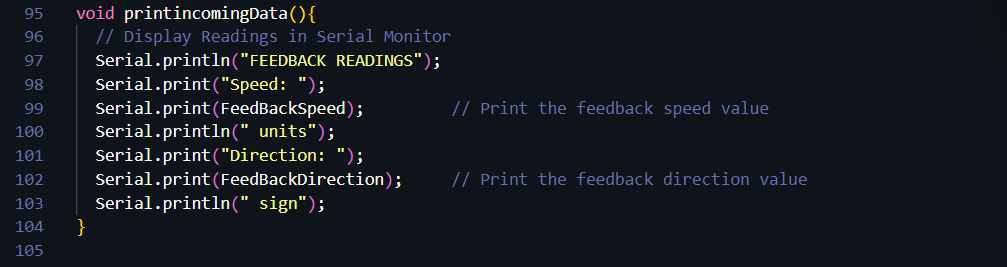
printincomingData()
-> This function prints the incoming feedback from the receiver to the transmitter. It’s helpful when you want to see what response or status the receiver is sending back.
OnDataRecv()
-> This is a callback function that gets triggered automatically when data is received using ESP-NOW. I’ve explained how these callbacks work earlier.
OnDataSent()
-> This is another callback function that is triggered after data is sent using ESP-NOW. I’ve also explained this previously.
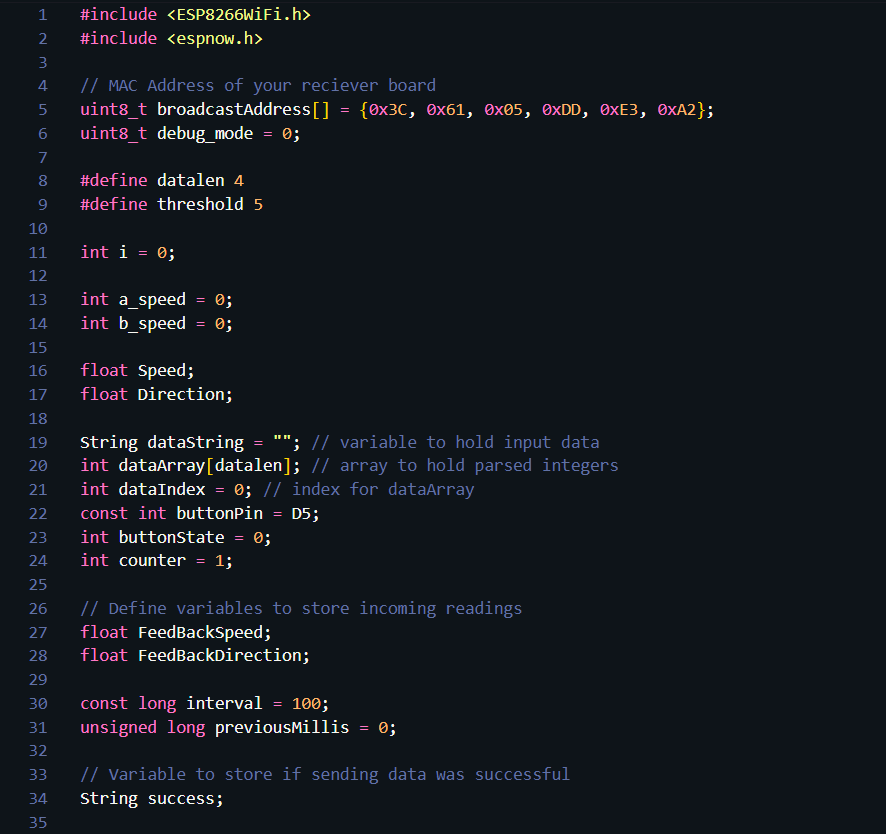
Transmitter code raw
#include <ESP8266WiFi.h>
#include <espnow.h>
// MAC Address of your reciever board
uint8_t broadcastAddress[] = {0x3C, 0x61, 0x05, 0xDD, 0xE3, 0xA2};
uint8_t debug_mode = 0;
#define datalen 4
#define threshold 5
int i = 0;
int a_speed = 0;
int b_speed = 0;
float Speed;
float Direction;
String dataString = “”; // variable to hold input data
int dataArray[datalen]; // array to hold parsed integers
int dataIndex = 0; // index for dataArray
const int buttonPin = D5;
int buttonState = 0;
int counter = 1;
// Define variables to store incoming readings
float FeedBackSpeed;
float FeedBackDirection;
const long interval = 100;
unsigned long previousMillis = 0;
// Variable to store if sending data was successful
String success;
/*
this is simple data structure to carry data
*/
typedef struct struct_message {
float speed;
float dir;
} struct_message;
///
struct_message Data_structure;
struct_message incomingData;
void parseData();
void printData();
/*
Below this, implemented the two ESP-NOW callback functions that handle
sending and receiving of data between ESP8266/ESP32 devices.
*/
void OnDataSent(uint8_t *mac_addr, uint8_t sendStatus) {
Serial.print(“Last Packet Send Status: “);
if (sendStatus == 0){
Serial.println(“sent successfully”); // Indicates successful transmission
}
else{
Serial.println(“fail to sent”); // Indicates failure in transmission
}
}
/*
This function is triggered automatically whenever data is received over ESP-NOW.
It copies the incoming bytes into the `incomingData` structure and updates global
variables for speed and direction accordingly.
*/
void OnDataRecv(uint8_t * mac, uint8_t *IncomingData, uint8_t len) {
memcpy(&incomingData, IncomingData, sizeof(incomingData)); // Extract received data into struct
if (debug_mode == 1) // Conditional debugging
{
Serial.print(“Bytes received: “);
Serial.println(len); // Print number of bytes received
}
FeedBackSpeed = incomingData.speed; // Update speed from received data
FeedBackDirection = incomingData.dir; // Update direction from received data
}
///
/*
Below this, created a helper function to print the received feedback
(speed and direction) to the Serial Monitor for debugging and monitoring purposes.
*/
void printincomingData(){
// Display Readings in Serial Monitor
Serial.println(“FEEDBACK READINGS”);
Serial.print(“Speed: “);
Serial.print(FeedBackSpeed); // Print the feedback speed value
Serial.println(” units”);
Serial.print(“Direction: “);
Serial.print(FeedBackDirection); // Print the feedback direction value
Serial.println(” sign”);
}
/*
Initialized the Serial Monitor, configured the ESP8266 as a Wi-Fi Station,
and set up ESP-NOW communication. This includes registering callback functions for data send
and receive events and adding a peer device for communication.
*/
void setup() {
// Init Serial Monitor for debugging
Serial.begin(115200);
// Configure the button pin as input
pinMode(buttonPin, INPUT);
// Set the device to Station mode (not Access Point)
WiFi.mode(WIFI_STA);
WiFi.disconnect(); // Ensure no previous Wi-Fi connection interferes
// Initialize ESP-NOW protocol
if (esp_now_init() != 0) {
Serial.println(“Error initializing ESP-NOW”); // Display error if init fails
return;
}
// Set the device role for ESP-NOW communication (can send and receive)
esp_now_set_self_role(ESP_NOW_ROLE_COMBO);
// Register the callback function to check if data was sent successfully
esp_now_register_send_cb(OnDataSent);
// Register the peer device to which this device will communicate
esp_now_add_peer(broadcastAddress, ESP_NOW_ROLE_COMBO, 1, NULL, 0);
// Register the callback function to handle incoming data
esp_now_register_recv_cb(OnDataRecv);
}
/*
This function is to read and process incoming serial data.
The function looks for data enclosed between ‘<‘ and ‘>’ characters, stores it
as a string, and calls the parsing function once a complete message is received.
*/
void get_serial_reading()
{
if (Serial.available()) { // Check if there is any incoming data
char incomingChar = Serial.read(); // Read the incoming character
if (incomingChar == ‘<‘) { // Start marker for data
dataString = “”; // Clear previous input data
dataIndex = 0; // Reset index for dataArray (if used)
} else if (incomingChar == ‘>’) { // End marker for data
parseData(); // Call function to parse the collected data string
// printData(); // (Optional) Uncomment to print parsed data for debugging
// control(); // (Optional) Uncomment to trigger control logic
} else { // If the character is part of the data
dataString += incomingChar; // Append character to the data string
}
}
}
// Normal loop to start with
void loop() {
unsigned long currentMillis = millis();
get_serial_reading();
if (currentMillis – previousMillis >= interval)
{
// time for last updated data
previousMillis = currentMillis;
get_serial_reading();
//Set values to send
// Data_structure.speed = dataArray[0];
Data_structure.dir = dataArray[1];
buttonState = digitalRead(buttonPin);
// Send message via ESP-NOW
esp_now_send(broadcastAddress, (uint8_t *) &Data_structure, sizeof(Data_structure));
// Print incoming readings
if(debug_mode == 1)
{
Serial.println(“———————— Debug Mode ———————-“);
Serial.println(“———————— FeedBack Data ———————-“);
printincomingData();
Serial.println(“———————— Parsed Data ———————-“);
printData();
Serial.println(“xxxxxxxxxxxxxxxxxxxxxxxxxxxxxxxxxxxxxxxxxxxxxxxxxxxxxxxxxxxx”);
}
}
}
// This one is to extract and convert comma-separated integer values from the received data string.
void parseData() {
int commaIndex = 0; // Index for locating commas in the input string
// Parse up to ‘datalen’ number of integers from the dataString
while (dataIndex < datalen) {
commaIndex = dataString.indexOf(“,”); // Find the position of the next comma
if (commaIndex == -1) { // If no comma is found, it’s the last value
commaIndex = dataString.length();
}
// Extract substring up to the comma, convert it to integer, and store in the array
dataArray[dataIndex] = dataString.substring(0, commaIndex).toInt();
// Remove the parsed value (and comma) from the original string
dataString = dataString.substring(commaIndex + 1);
dataIndex++; // Move to the next index in the array
}
}
// This one is to display the parsed integer values stored in the array for debugging or verification.
void printData() {
Serial.print(“Parsed data: “);
// Loop through the array and print each parsed integer
for (i = 0; i < datalen; i++) {
Serial.print(dataArray[i]);
Serial.print(” “);
}
Serial.println(); // Move to the next line after printing all data
}
Receiver code raw
#include <ESP8266WiFi.h>
#include <espnow.h>
// MAC Address of your transmitter board
uint8_t broadcastAddress[] = {0x3C, 0x61, 0x05, 0xD5, 0xD4, 0xC1};
uint8_t debug_mode = 1;
#define speed_pin 11 // D1
#define dir_pin 10 // D2
#define datalen 4
#define threshold 50
int i = 0;
int a_speed = 0;
int b_speed = 0;
int ledPin = 0;
int Speed = 1;
int Direction;
// Define variables to store incoming readings
float incomingSpeed;
float incomingDir;
String dataString = “”; // variable to hold input data
int dataArray[datalen]; // array to hold parsed integers
int dataIndex = 0; // index for dataArray
const long interval = 100;
unsigned long previousMillis = 0;
// Variable to store if sending data was successful
String success;
//Structure example to send data
//Must match the receiver structure
typedef struct struct_message {
float speed;
float dir;
} struct_message;
// Create a struct_message called Data_structure to hold sensor readings
struct_message Data_structure;
// Create a struct_message to hold incoming sensor readings
struct_message incomingReadings;
// Callback when data is sent
void OnDataSent(uint8_t *mac_addr, uint8_t sendStatus) {
if(debug_mode == 1)
Serial.print(“Last Packet Send Status: “);
if (sendStatus == 0){
if(debug_mode == 1)
Serial.println(“Delivery success”);
}
else{
if(debug_mode == 1)
Serial.println(“Delivery fail”);
}
}
// Callback when data is received
void OnDataRecv(uint8_t * mac, uint8_t *incomingData, uint8_t len) {
memcpy(&incomingReadings, incomingData, sizeof(incomingReadings));
if(debug_mode == 1)
{
Serial.print(“Bytes received: “);
Serial.println(len);
}
incomingSpeed = incomingReadings.speed;
incomingDir = incomingReadings.dir;
}
// ##edit this function
void getReadings(){
// receving data
Speed = incomingSpeed; //
if (isnan(Speed)){
Serial.println(“Failed to read”);
Speed = 0.0;
}
// reciving data
Direction = incomingDir; // ##replace this from direction
if (isnan(Direction)){
Serial.println(“Failed to read”);
Direction = 0.0;
}
}
void printIncomingReadings(){
// Display Readings in Serial Monitor
Serial.println(“INCOMING READINGS”);
Serial.print(“Speed: “);
Serial.print(incomingSpeed);
Serial.println(” units”);
Serial.print(“Direction: “);
Serial.print(incomingDir);
Serial.println(” sign”);
}
void setup() {
// Init Serial Monitor
Serial.begin(115200);
pinMode(ledPin, OUTPUT);
// Set device as a Wi-Fi Station
WiFi.mode(WIFI_STA);
WiFi.disconnect();
// Serial.println(“I am Receiver:{0xA4, 0xCF, 0x12, 0xF3, 0x84, 0x5D}”);
// Init ESP-NOW
if (esp_now_init() != 0) {
Serial.println(“Error initializing ESP-NOW”);
return;
}
// Set ESP-NOW Role
esp_now_set_self_role(ESP_NOW_ROLE_COMBO);
// Once ESPNow is successfully Init, we will register for Send CB to
// get the status of Trasnmitted packet
esp_now_register_send_cb(OnDataSent);
// Register peer
esp_now_add_peer(broadcastAddress, ESP_NOW_ROLE_COMBO, 1, NULL, 0);
// Register for a callback function that will be called when data is received
esp_now_register_recv_cb(OnDataRecv);
}
void loop() {
unsigned long currentMillis = millis();
if (currentMillis – previousMillis >= interval) {
previousMillis = currentMillis;
getReadings();
//Set values to send
Data_structure.speed = Speed;
Data_structure.dir = Direction;
// Send message via ESP-NOW
esp_now_send(broadcastAddress, (uint8_t *) &Data_structure, sizeof(Data_structure));
// Print incoming readings
if(debug_mode == 1)
{
Serial.println(“———————— Debug Mode ———————-“);
Serial.println(“———————— Incoming Data ———————-“);
printIncomingReadings();
// control();
Serial.println(“xxxxxxxxxxxxxxxxxxxxxxxxxxxxxxxxxxxxxxxxxxxxxxxxxxxxxxxxxxxx”);
}
}
}
//////////////////////////////////////////////
// work on “Speed” and Direction “variable”
void control()
{
// Serial.print(“in control function Speed = “);
// Serial.println(Speed);
// Serial.print(“in control function direction = “);
// Serial.println(Direction);
if(Speed > threshold)
{
a_speed = int(Speed);
analogWrite(speed_pin, a_speed);
digitalWrite(dir_pin, LOW);
// analogWrite(PWM2, a_speed);
// digitalWrite(DIR2, LOW);
}
else if(Speed < -threshold)
{
a_speed = int(-1*Speed);
analogWrite(speed_pin, a_speed);
digitalWrite(dir_pin, HIGH);
// analogWrite(PWM2, a_speed);
// digitalWrite(DIR2, HIGH);
}
else if(Direction > threshold)
{
b_speed = int(Direction);
analogWrite(speed_pin, a_speed);
digitalWrite(dir_pin, LOW);
// analogWrite(PWM2, a_speed);
// digitalWrite(DIR2, HIGH);
}
else if(dataArray[1] < -threshold)
{
a_speed = -1*dataArray[1];
analogWrite(speed_pin, a_speed);
digitalWrite(dir_pin, HIGH);
// analogWrite(PWM2, a_speed);
// digitalWrite(DIR2, LOW);
}
else
{
analogWrite(speed_pin, LOW);
// analogWrite(PWM2, LOW);
analogWrite(dir_pin, LOW);
// analogWrite(DIR2, LOW);
dataArray[0]=0;
dataArray[1]=0;
a_speed = 0;
b_speed = 0;
// dataArray[2]
// dataArray[3]
}
}
////////////////////////////////////////////
For any doubt or query we can discuss in comment section !
Lets learn together YEAH !!!